Showing posts with label Tools of the Trade. Show all posts

Wednesday, August 12, 2020

Notes for Sewing Room Outside


I began with a box that had been created for us in a club situation.  One of our members Pate Steele’s husband created them for us.   I bought a few of them.  (Many mini and doll projects were calling.)

They looked like this:


I painted the box black and filled the interior with the Itsy Bitsy Mini wallpaper in fashion design.   I could not locate my specific pattern, but there are many from which to choose and personalize your room box. 

When that was complete, I decided to then paper the box, though I had already painted it.  So, I began to choose from some shelf papers in a French Toile pattern. 


After covering the lower portion of the box with the toile, I tried to think of something different for the top portion.  The box sat for a little while.  (I played with the interior a bit, to be honest.)   I thought and thought, and came upon the idea that this was a pattern box.  It was a sewing room or shop after all.  Placing a number of patterns in a basket, I took pictures from the top, bottom, right, left, back, and then printed, and cropped until I got the right picture for the top edges of the room box.  That was fun, however; it took a great deal more time than I thought. 


A little braid trim to hide the seam line and it was time for the fun stuff!!! 


And here is the fun stuff again! 

Use your imagination, and Have Fun!
Kathi


Thursday, November 11, 2010

Take Good Pictures

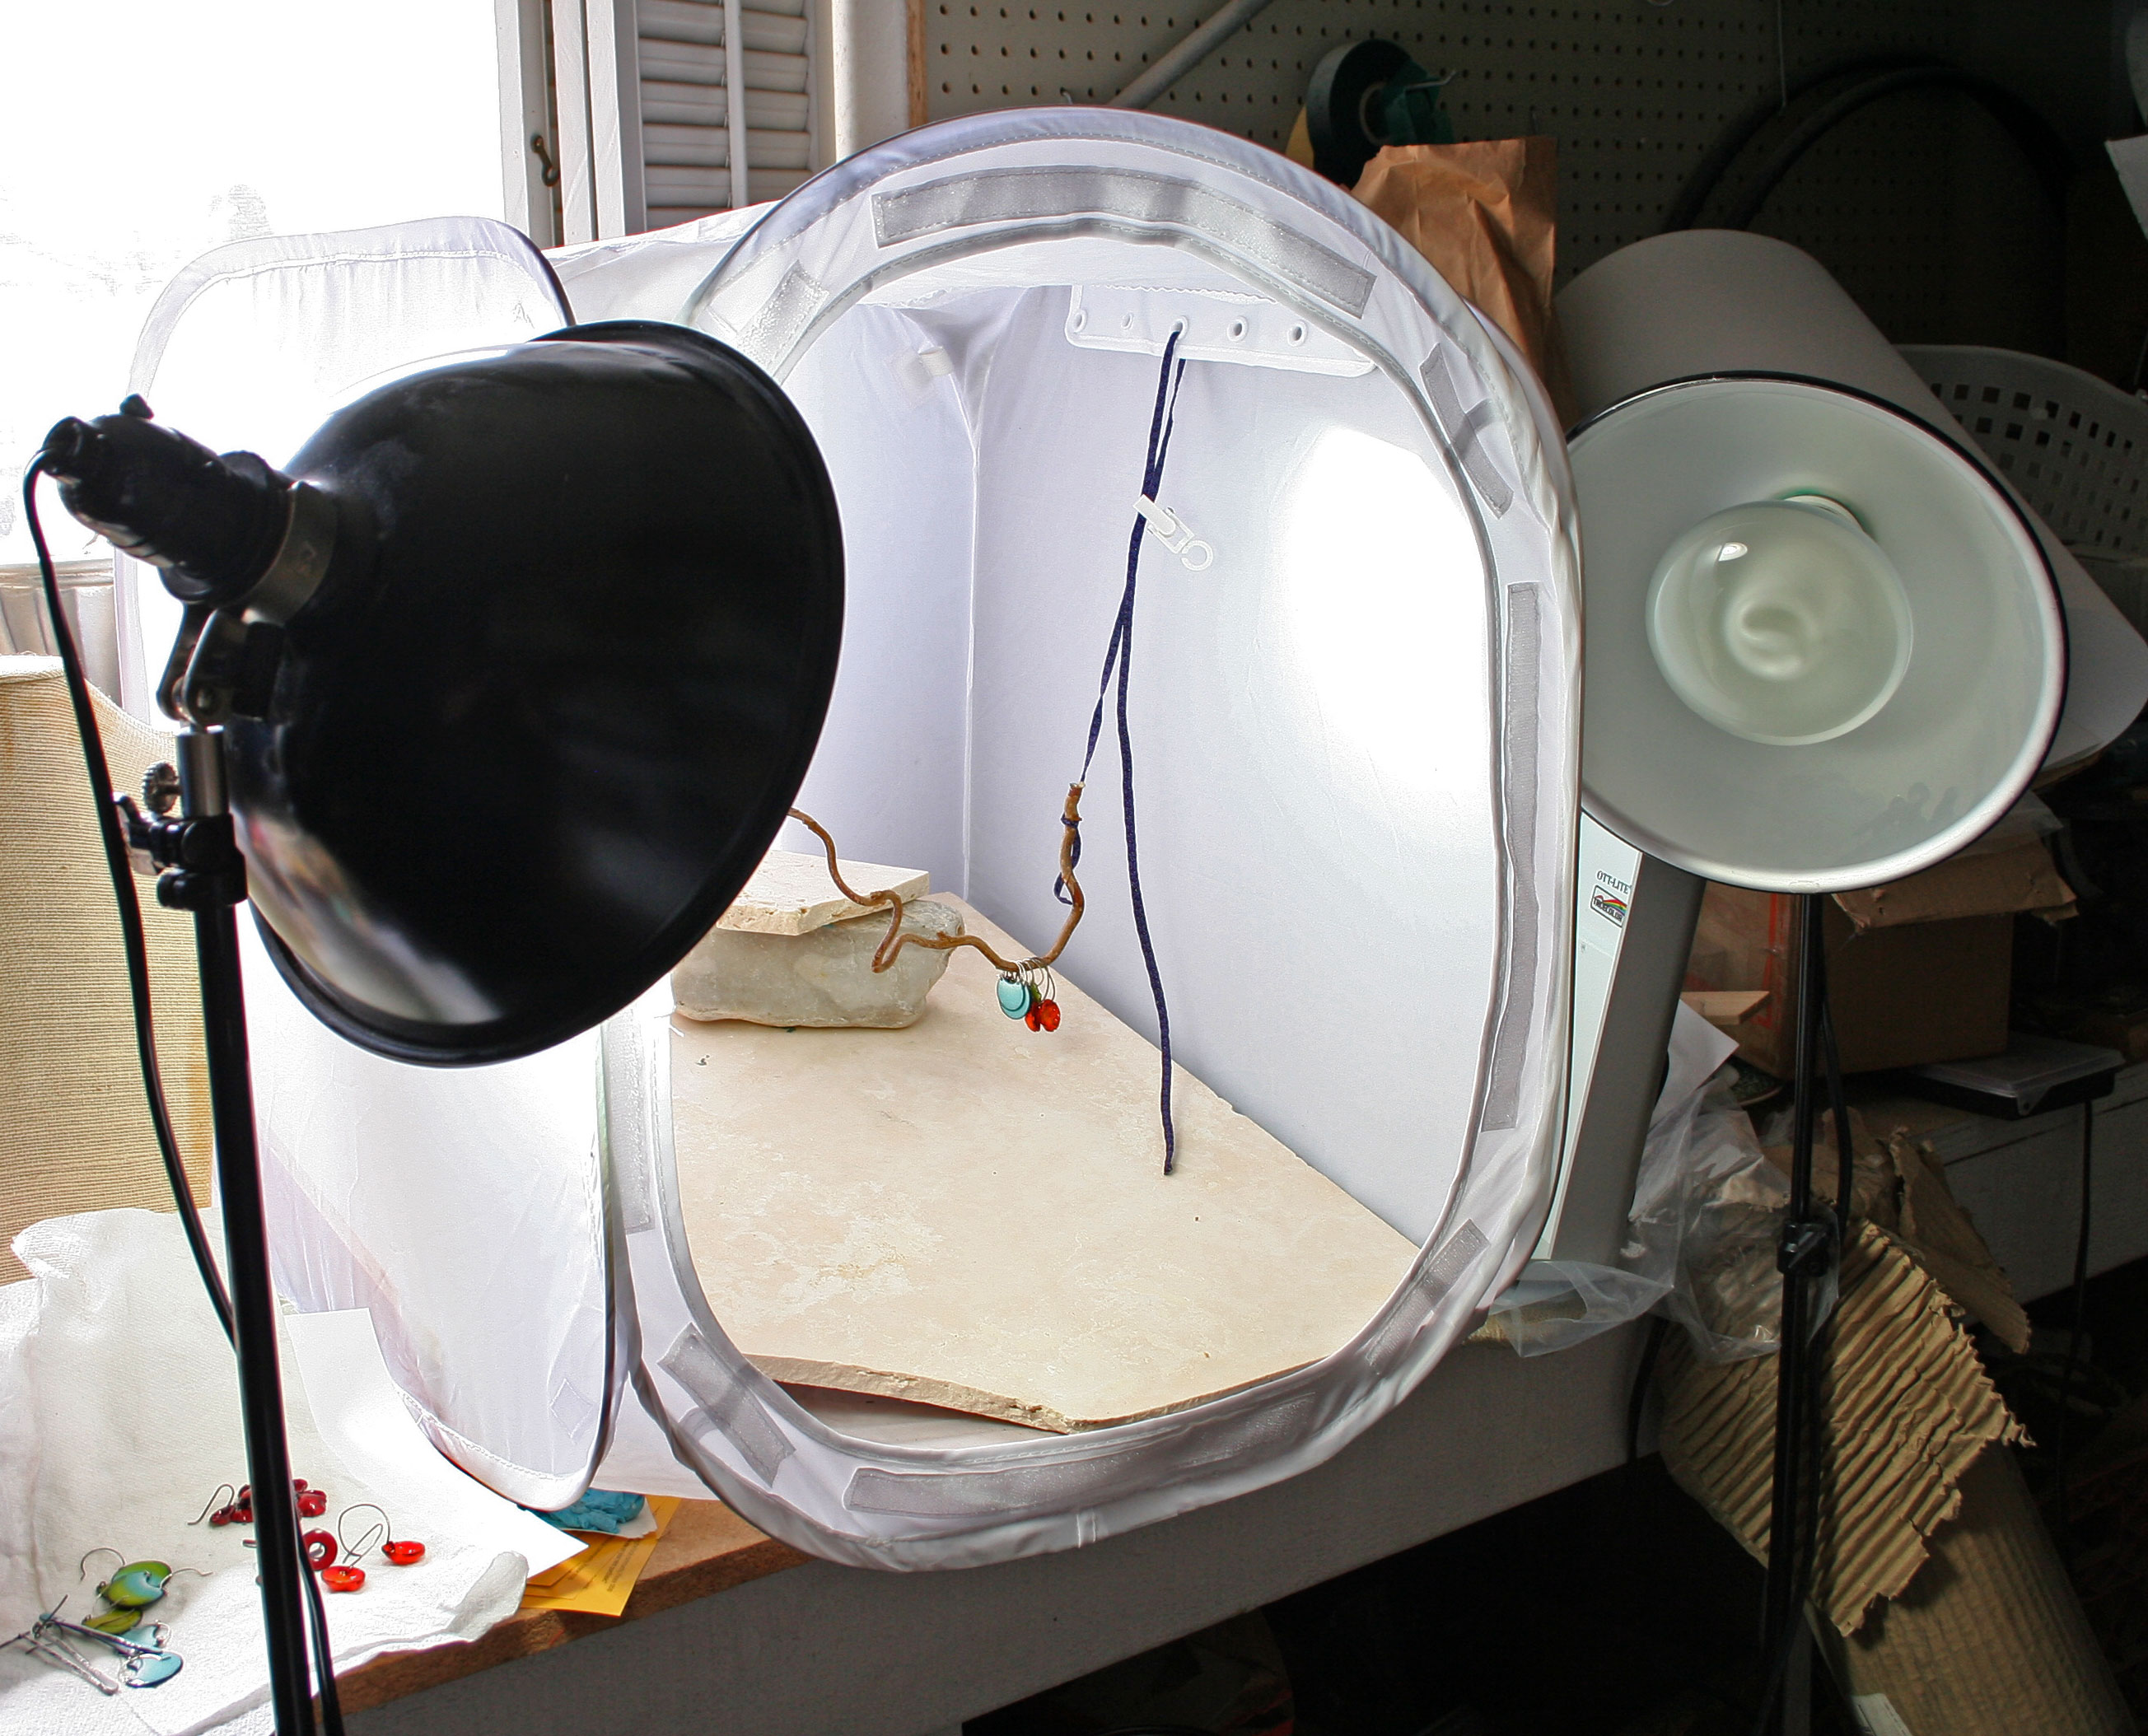
I while back on my Teka and Zoe Blog I posted several articles on my trials and tribulations on Photography (see full set of articles here: http://tekaandzoe.blogspot.com/search/label/Photography ). Although the articles speaks mostly of my Jewelry, which has been more challenging than my dolls, the information is good all around. It has taken me a long time to get to were I feel that I take reasonably good pictures of my goods. In the past articles I never got to actually showing you what my set up looks like (see above). It is a EZ CUBE Table Top Studio. It isn't pretty as it is set up in the back garage. I have also learned since this picture was taken- Don't have natural light streaming in if you have bulb lighting. I actually use Trumpet Daylight bulbs now(to the right). I use these bulbs as they remain cool. I used to used regular photography bulbs but after being turned on for any hour they got HOT! Burn you hot! To mix the color of natural light with daylight bulbs it sometimes gave me a pink cast. I fought it for a long time. YUCK! So I now close the blind and just use the bulbs and even have the same type of bulb in each light. My camera goes on a tripod in front of the tent. I have also added an additional light on top of the tent as sometimes at night it is too dark. Having 3 kids and working at home I do not have the luxury of taking pictures outside in perfect nature light. I have also learned the hard way that if you adjust your exposure on your camera it is sometimes better to go a bit darker than overexposed which is harder to correct in editing. Also, harsher light can mess with the color even when you use white balance. When you look in the picture above showing my setup you will see the piece of travertine tile I bought to shoot on. If I only knew...It has an annoying pink sometimes yellow undertone. Look for this kind of thing in your backdrop. I purchased a tan velvet paper once that had a weird red undertone when photographed. Not good. I wish I had gone grayer in tone in my stone. But I did find a gray rock that I can use as a prop that helps balance the color. I spend more time editing to get rid of the pink then I should have to. But it has helped to cut out the natural light. Here are 2 pictures right out of my camera unedited. One on the more yellow rock that sometimes give pink undertones and the same earrings on the gray rock. They were taken during the same photo session, same light.
But the best part of my photography is that I finally took the plunge and bought a nice camera that I LOVE. I got a Canon Rebel XT. LOVE LOVE LOVE it! I use the white balance on my camera but sometimes I just put it on the dummy settings and get good shots without messing with it. I pretty much always take numerous pics of the same earrings in the same setting but adjust the white balance and exposure 2 or 3 times. Then I know I got the shot. Plus I may jiggle even with the tripod. Or if I use auto focus it may focus on the rock not the piece. I learned in my last session no matter how much you focus your camera you will never get the shot in focus if you do not have your glasses on. HA! I have a hard drive that is full of 3/4 bad shots 1/8 good shots and 1/8 am happy with shots after editing. Below are some some shots of dolls. The first one is an old doll picture before the EZCube..notice in the picture the harsh shadows? The second picture is one in taken in the table top studio. Much better I think.
Michelle minidolls.com

Wednesday, June 16, 2010

What is Mica?

The mica group of sheet silicate (phyllosilicate) minerals includes several closely related materials having highly perfect basal cleavage. All are monoclinic with a tendency towards pseudo-hexagonal crystals and are similar in chemical composition. The highly perfect cleavage, which is the most prominent characteristic of mica, is explained by the hexagonal sheet-like arrangement of its atoms.The word "mica" is thought to be derived from the Latin word micare, meaning "to glitter", in reference to the brilliant appearance of this mineral (especially when in small scales).
How 'bout that for to technical??
Ok....so the fun facts. I use Mica for my fairy wings. The sheets that I sell on my website are transparent- Kind of light tan. There are many layers with in each sheet. They can be "delaminated" or split apart into several thinner sheets. Natural mica is heat resistant, acid free and lightfast. Each Tile is distinctly different from the other. They can be delaminated and relaminated making them perfect for preserving photos, pressed flowers and mementos. Uses include jewelry making, painting, embossing, collage art, card making and ornamentation. You can drill holes and add rivets. It is archival, lightfast, acid free, heat resistant. Tiles vary in shape and size. It can be easily with your sharp junk scissors. It can be stamped on, embossed, glued, painted, alcohol inked, decoupaged.....What else can you think of?
I have also used Mica in flake form. The come in numerous sizes and colors of flakes. Some of the larger pieces look like crystal shards. I really like the gold flake as it really does look like gold. Here are pics of the flakes glued to white and black:


There are also Mica powders available. They are ground very finely. Imagine the glimmery look of eye shadow. Mica power are metallic colored, non-tarnishing natural tiles of mica. They can be used with most any adhesive, acrylic medium, or transparent finish. The flakes adhere to most any surface and can also be applied dry to any tacky surface. Mica powders are great for collage, papermaking, rubberstamp embossing, and wherever a natural, shimmering, glittery effect is desired. The flakes are pigment coated, heat resistant, acid-free, and archival.
You can see the Mica products I carry by following this link: MICA
Michelle Mahler minidolls.com Doll Artist's Workshop

Saturday, April 5, 2008

Tools of the Trade - Also stuffed inside the Box

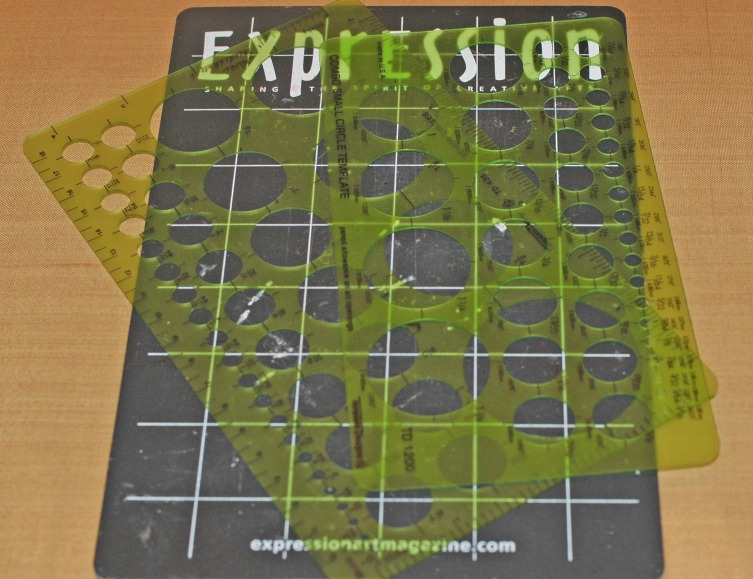
Since we have discussed so many tools this week, I thought I would share what I sometimes stuff inside the box. Neatly stuffed in the back behind the plastic boxes is a circle template and a small self healing cutting surface. The circle template is a must have for miniature hats. I also have ovals, ellipses and squares. But they are tucked away in a sometimes used folder. (the Expressions cutting mat was a freebie. I LOVE the magazine. So creative.) The mat is about a 5" x 7" mat. Very convenient for traveling.

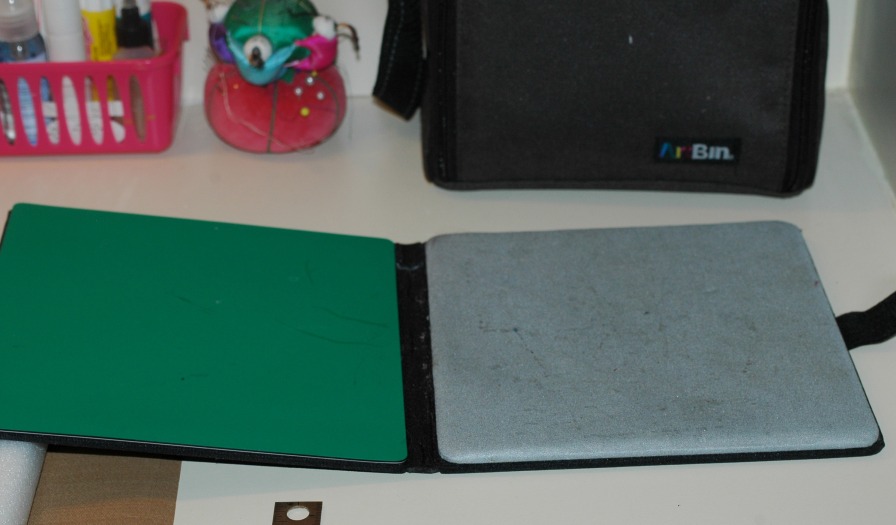
In the picture of the travel bag closed you will see another tool I keep handy. My friend bought me this for my birthday last year and I don't go anywhere without it. Shown open the Omnigrid has an ironing surface and a cutting surface. Fabulous tool! You've got to love quilter's!

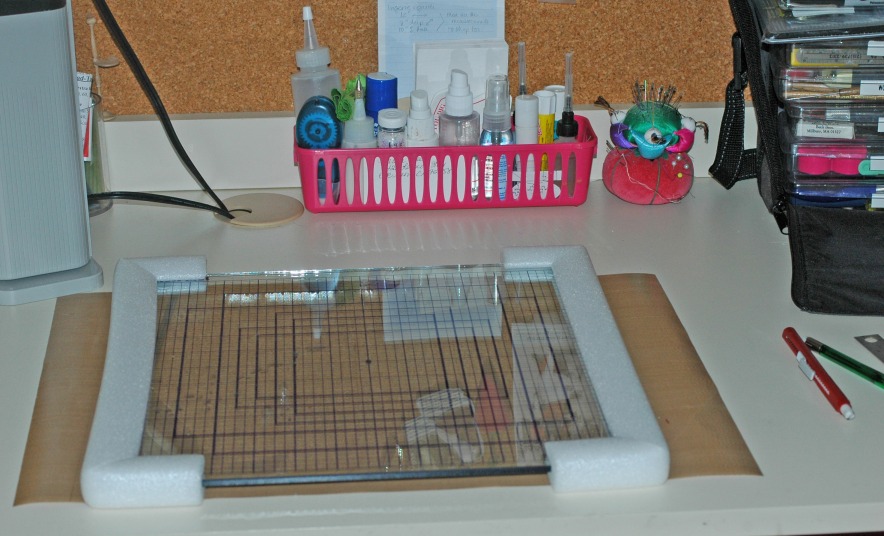
The work surface is covered with a nonstick ironing pad. Bakers call them silipads. (Silicone coated fabric) That is the brown pad underneath. The class sheet is used in scrap booking, but I use it for pattern drafting, and many other things. It is great as a non stick surface and easily cleaned as well. When I am not working I leave the protective sides on it.

The long hot pink plastic basket in the back has cleaner for my glasses, glue sticks, Glove in a Bottle (wonderful for your hands) more glue, glue bottle, water spritzer and Fray Check. You'll see pin cushions and extra lighting. What is not pictured here is my magnifiers. I use the kind that clip to the front of my glasses. Often these are also found in quilt shops.

This concludes the travel bag and organized desk section. I look forward to bringing you another section for Tools that will show you the various jigs I have and use. There are some pretty creative ones , too. If there is anything about the tools you would to know or see demonstrated, let us know!

Wednesday, April 2, 2008

Tools of the Trade - Box 6 - Wire

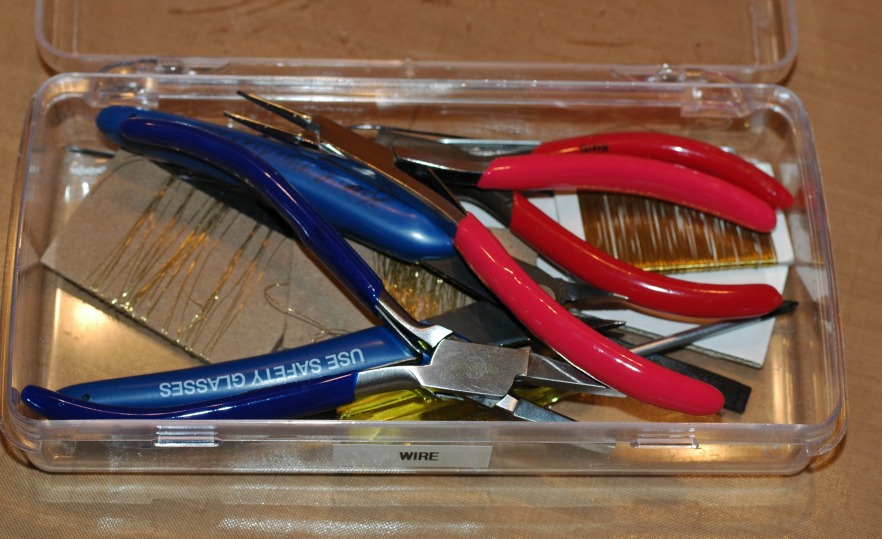
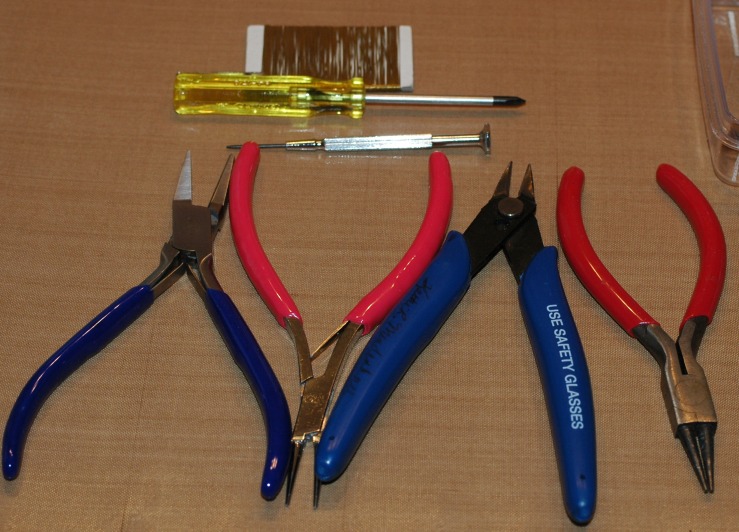
Wire! We are getting to the end of the tool box now. It is obvious that I cannot put too many tools in this box, so choose your very favorites. These are mine.

The first set of "pliers" has a flat wide jaw. (3/8") It is of very good quality. With red handles the next set is a fine nosed rosary pliers. (I think these are also called chain nose, but I could be wrong) Wire cutters are next with blue handles and rounding out the pliers are another set of rosary pliers that are larger. Please buy the best quality you can afford. The results are worth it. At the top is a bit of wire just in case, a small Phillips head screwdriver and a small jeweler's flat head screwdriver.

Arrange these neatly as the plastic could crack.

Tuesday, April 1, 2008

Tools of the Trade - Box 5 - Write

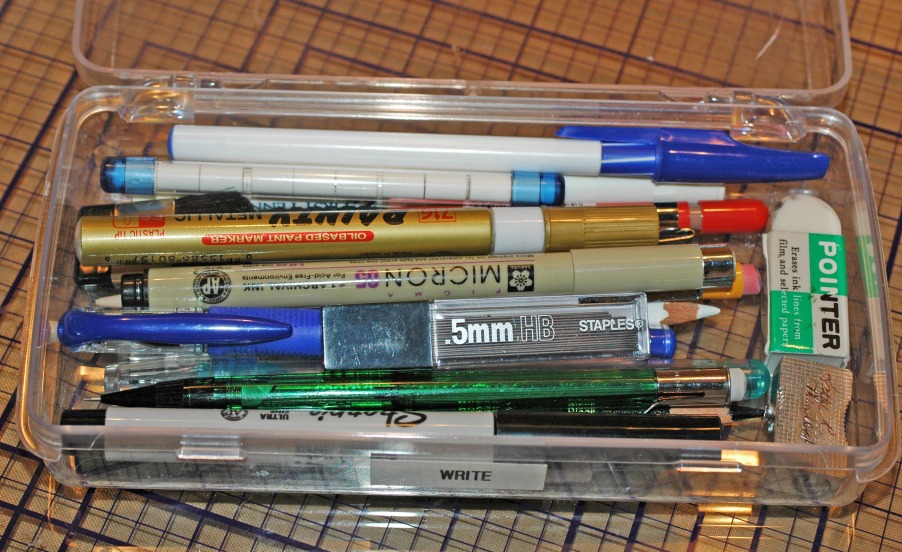
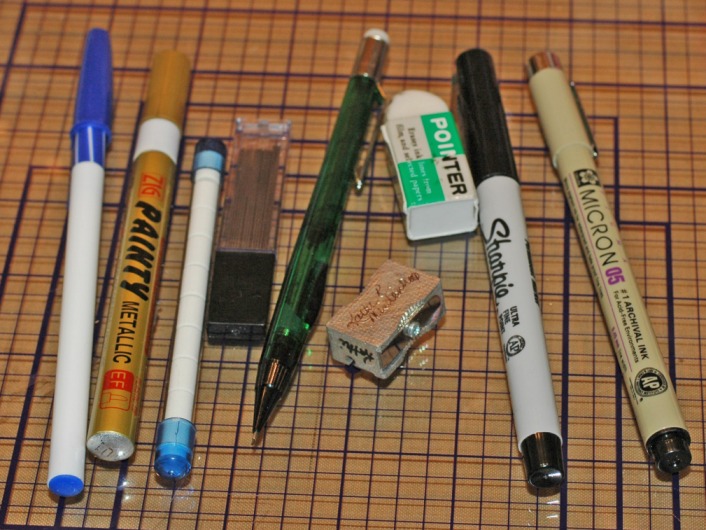
Write. Well, is there anything to say here? Well, maybe a few notes. Filled it looks like a child's pencil box, but my pens and pencils are a little more special. Well, I am going to tell you that anyway!
Here's what you'll find as my favorites, the ever popular ball point pen. The cool thing about the ball point is that if you scrapbook, you can use your own writing, sprinkle your embossing powder on it and heat with the embossing gun. There you have a beautiful embossing in your own hand. Next is a metallic pen. Pictured is gold, but I have silver as well. A mechanical pencil is a must, as well as replacement erasers and leads. I also have, but not pictured here is the click eraser. Love it. The large art eraser and a pencil sharpener for colored pencils, regular pencils and my watercolor pencils. Sharpies, or permanent markers in both sizes. (I also use the fine Sharpie to write my name on all my tools.) finally you will see a Micron pen. I have a set of these in several sizes and colors.
Other really important and valuable tools you might consider are water and air erasable fabric markers and quilt marking pencils. I use a white for dark fabrics and black for light fabrics.

Thursday, March 27, 2008

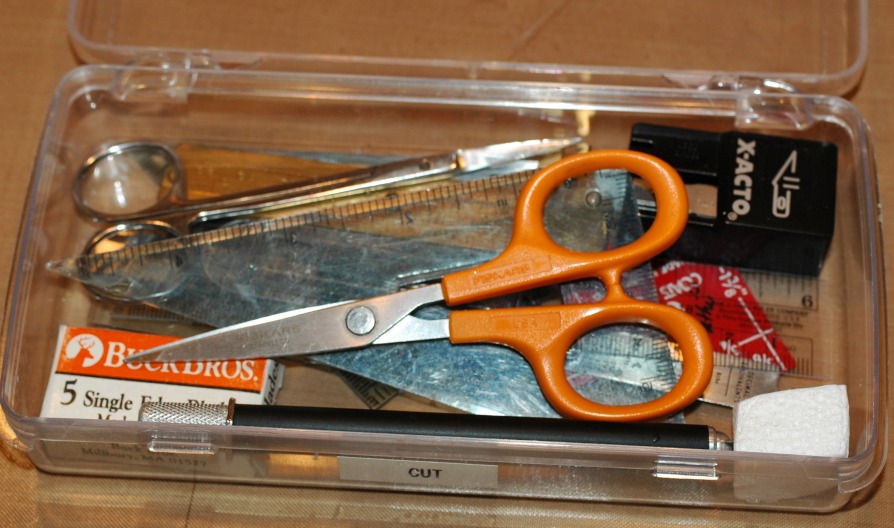
Tools of the Trade - Box 4 - Cut

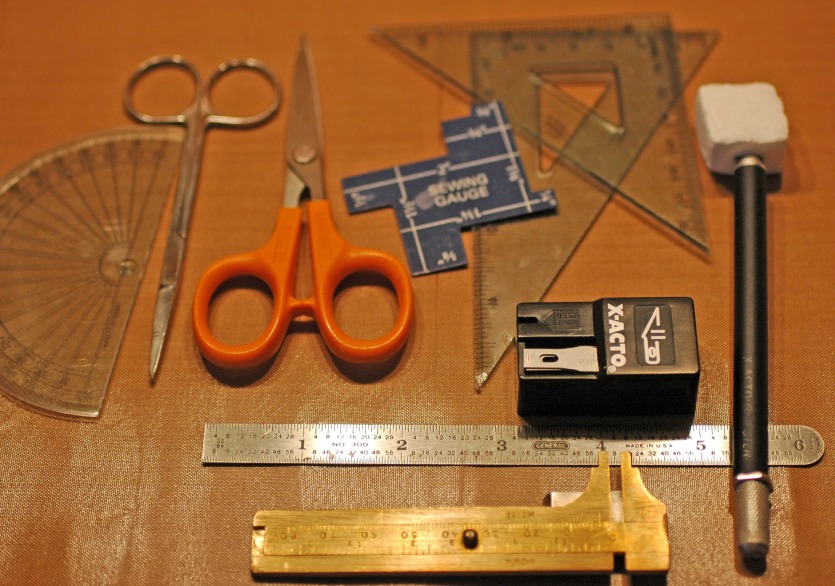
Cut. I think "cut" is pretty self explanatory but it can be expanded on. Remember the rule, "Measure twice, cut once!" Fits anywhere and especially in sewing and miniatures. So, within cut I have rulers as well.
Let's talk cutting first. I do not put my sewing scissors here. These are paper and other scissors only. The first pair is a good pair of scherenschnitte scissors, (little paper cuttings and silhouettes), a good pair of paper cutting scissors and an Xacto knife with fresh blades. These are the must haves in miniatures.
The rulers are simple ones as well. A nice metal 6" ruler in metric and English, not pictures is also a transparent ruler, a couple of squares and a compass. The little blue ruler is one ingenious little measuring tool. Each side is broken up into measures of an inch and can be quite useful. Plus, it fits in a small space!
I also keep a fine set of calipers handy. I use this a lot in working with metal. Kathi

Monday, March 24, 2008

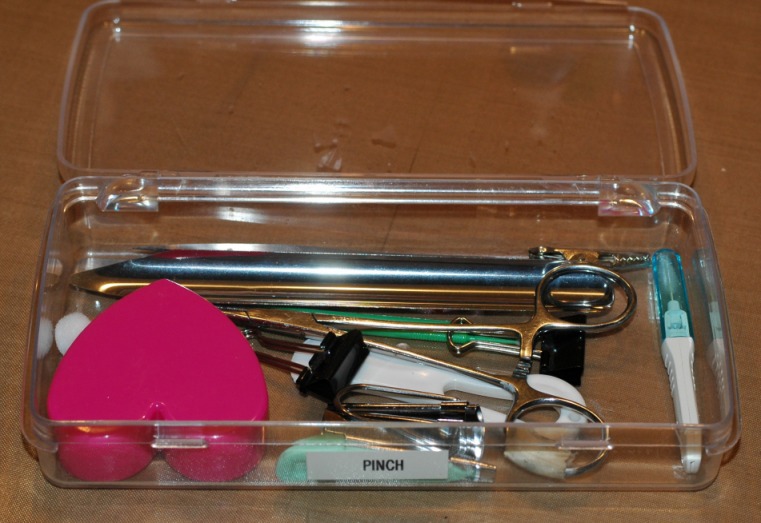
Tools of the Trade - Box 3 - Pinch

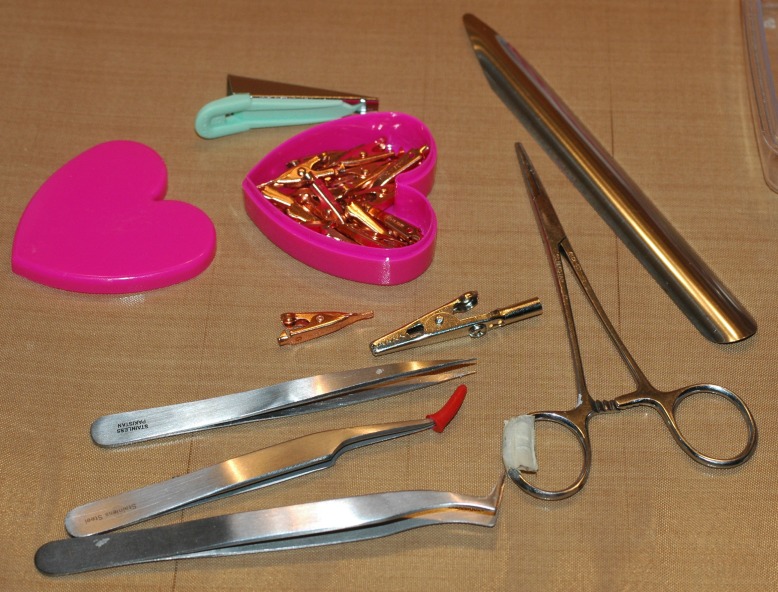
Pinch. There is not so much in the pinch box as I have recently cleaned it out. But we don't need much, a favorite is a favorite.

The little plastic box contains some electronic testing clips I purchased from Radio Shack. The light blue tool is used to make bias binding. I keep it handy as I use sewing for larger dolls. The ever present alligator clips, but I don't like to leave "tooth" marks on things. I have 4 favorite tweezers. Each of the small tweezers has a very sharp, pointed tips. The hemostats, some call forceps as well, are the ultimate tweezers, plus they will clamp closed to hold something in position.
The curved metal tool is for scooping up beads, and which of us hasn't cursed a time or two when we knocked over that box of beads? It really helps make picking them up and pouring them back into the container easier. Sometimes the best tools are not the most expensive.

Friday, March 21, 2008

Tools of the Trade - Box 2 - Wood

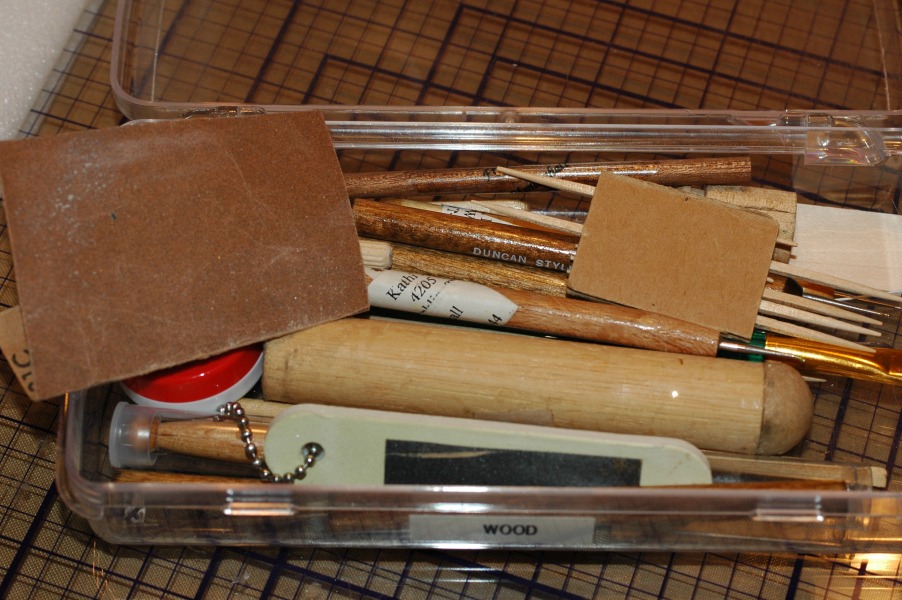
Wood. Today we talk about the box named wood. This is really a catch all for things with wood handles, but there are some tools for working with wood as well.

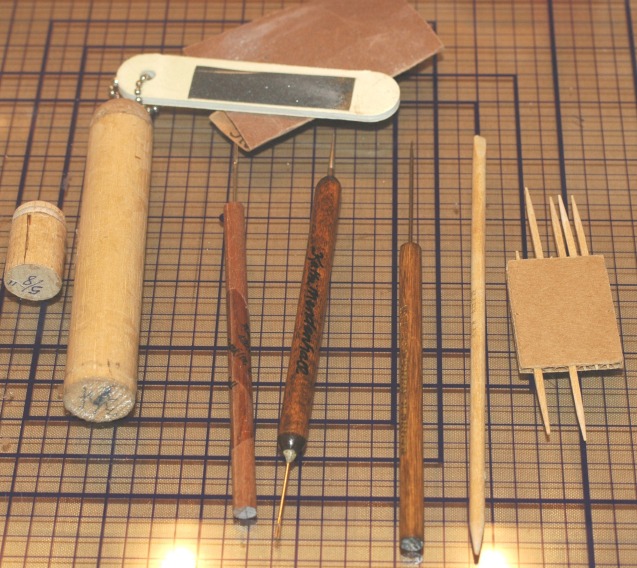
My favorite tools for wood are shown here. The 5/8" dowel and 3/4" dowel both have a half ball on the end as well. These are used as guides and shapers to make miniature hats. Hat forms, I should say.

The travel nail file and sand paper are for wood finishing. The three dark wood tools in the center are a rose tool, a combination rose tool and ball stylus and a needle tool. I have been asked many times how I keep white items clean while working on them and my response is the needle tool. I can use it to place or spread glue, poke things in place, tame feathers and ribbons and many more uses. I think it is my favorite and most used tool after scissors and tweezers.

Finally, the right side shows an orange stick and strange little tool of toothpicks and corrugated cardboard. The cardboard holds the toothpicks in place and the distance between the two is used to help make bows in a consistent size. This too is a tool I created from some one else's wonderful imagination. I did not have the space for a comb or other methods. I like this one.

Also in the box you will notice more tools, however they are more than likely doubles and varying sizes of the ball stylus. Kathi

Wednesday, March 19, 2008

Tools of the Trade - Box 1 - Sew

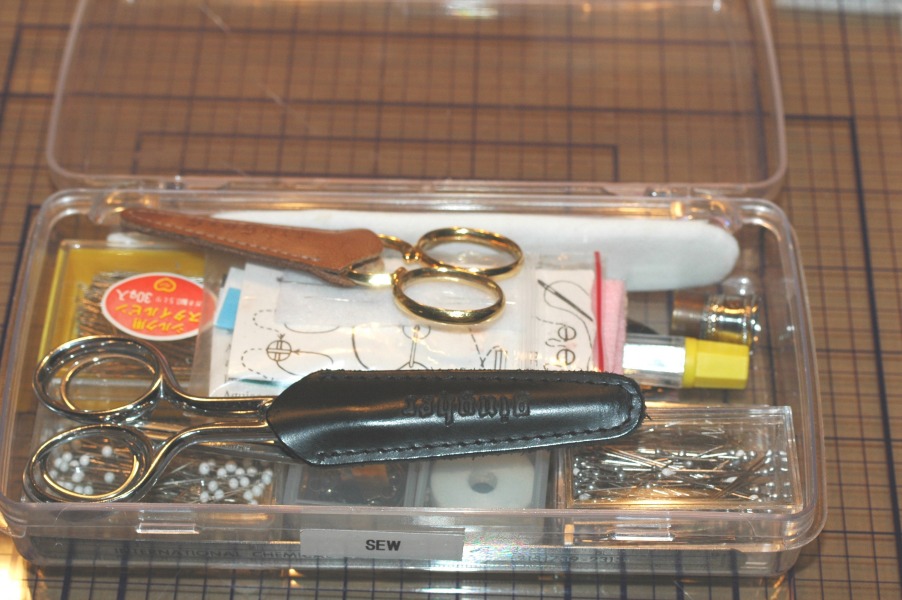
Today I am going to show you the Sewing Box. Within this sewing box I have the various sewing items based on the sewing I do most. Let's talk about the items and what I like about mine and you can decide about your own.

In the sewing box all filled you will notice there are different kinds of pins and needles and couple extra cases. I'll explain these also. But you can see I can squeeze a quite tidy amount of needed items in my little plastic case.

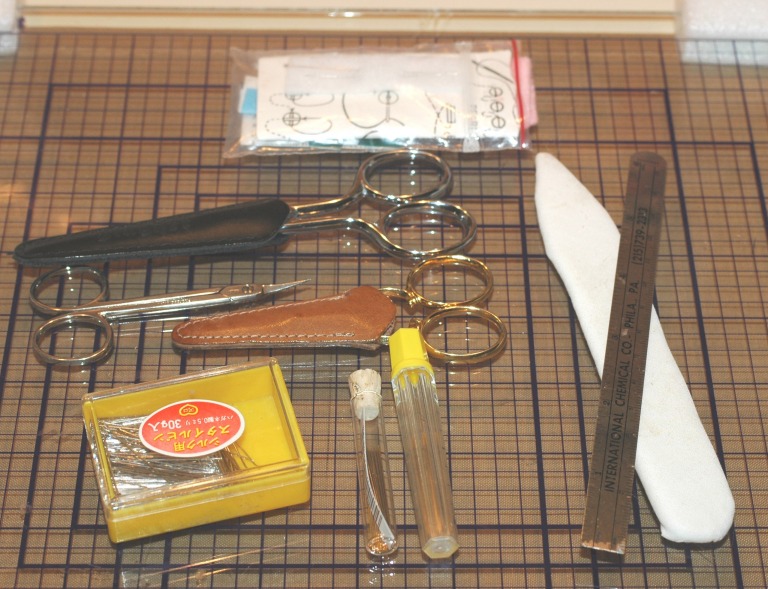
My most used items are a set of tiny and long beading needles in the plastic bag. I think they are a size 15 or 16. I try to take good care of them. I have a long set of embroidery scissors (Gingher in black leather case), a set of cuticle scissors (multitude of uses), a small pair of Gingher (brown leather case), silk pins, needle cases for my favorite needles, a ruler and a little ironing board.

(You might notice that there is Japanese writing on the yellow silk pin case. I lived in Japan for quite a few years and have guarded this box jealously. )

I have two favorite sewing needles, Clover Golden Eye 10 Sharps and Nickel plated #9 needles. I have a ruler in almost every plastic box. The little ironing board is made from a tongue depressor, shaped into a point, padded and covered with cotton. Comes in really handy. I read about this a long time ago and would like to give credit but I have no idea where I read it.

In the box you might notice I have assorted straight pins, they come in handy. There are "bug" pins and quilters pins, a thimble and some thin beading thread and needle threaders. What is going to be in your sewing box? Kathi

Saturday, March 8, 2008

Bunka Bunka Bunka..What the heck is Bunka??

Bunka is a knitted rayon crepe thread. The best Bunka is usually if not always made in Japan. Its primary use is to embroider with. This is called painting with thread. A sample of this embroidery is to the left. This trim is especially valuable to miniaturists, because when you pull a single thread of the "cord" and pull, it unravels to form a nice, loopy, curly, stretchy thread which can be used for many things. Notice the unraveled samples in the photograph. You can also see the difference between a quality bunka(top) and a lesser. I think the KAO Brand is the best as when it is unraveled the curls are nice and even. I import the KAO Brand from Japan. It is sometimes thought of as a trim for the novice minaiturist. But I think there are zilllions of uses for bunka thread in miniature and doll making. You can use it raveled or as is (right). I have used it as a trim of course. You can make faux embroidered roses by snipping the raveled threads into bits and gluing into rose shapes. I have even used this little bits to fill in and color lace (left). You can also unravel it then iron it flat for a very delicate thread/trim. It can be used on other miniature creations to. Like piping for upholstery and drapery. There are artist's that use bunka to create faux punch carpets (below). They are works of art. It is the perfect fiber to use hair for doll's doll hair...or dolls of a smaller scale like 1/24. It creates perfect ringlets! It can also be used in making some flowers such as lilacs or even for flower centers. If you have unique use for Bunka send me a picture and tell me about it: mailto:michelle_mahler@hotmail.com I will add it to this Bunka article. Here is a picture of a customer of mine, Tres Beertema of The Netherlands, carpets. These are works in progress showing 1":1' cartpets made of Bunka.

Thursday, January 31, 2008

Pleaters

There are some tools on the doll makers work bench that are a must have. Pleaters are one of the the must haves. I carry 3 sizes of the Pretty Pleater and one of the Perfect Pleater. Here are some samples of dolls that I have made using "pleated" lace and trims. This will show you the difference in each pleater. I have also use the 1/2" and 1/4" Pretty Pleater to pleat hair for Fairies and for the 20's Marcel Wave bob or for child's hair styles. The key to using the pleater especially for hair is that after steaming make sure it is dry and cool. Keep in mind that if you make bigger dolls the dolls pictured are doll house size 6" and under for scale.

Pretty Pleater 1/2 Scale

Pretty Pleater 1/4 Scale